プッシュ通知(Android)
 プッシュ通知
 会員管理・認証
 SNS連携
SNS連携 データストア
 位置情報検索
 ファイルストア
 スクリプト
スクリプト位置情報連動配信
Contents |
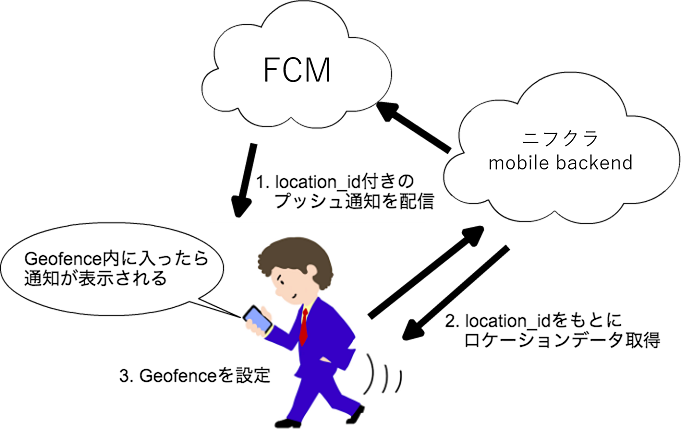
位置情報連動配信の概要
位置情報のデータ保存とサーバーからのプッシュ通知配信に
ニフクラ mobile backendを利用します。
AndroidのGeofence機能を利用することで、ある領域へ出入りしたかをモニタリングできるようになります。
ニフクラ mobile backendとGeofence機能と組み合わせることで、
通知を行う位置を動的に更新できる仕組みを作ります。
(アプリの主な動作フロー)
- Silent Push通知を配信
- Silent Push通知の内容から通知を行う位置を取得
- Geofenceを設定
このページでは、以下の設定が済んでいるものとして説明していきます。
- Android SDKのインストールと初期化
- 通常のプッシュ通知設定
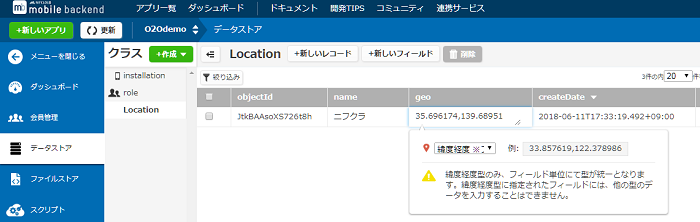
位置情報データの登録
位置情報をあらかじめデータストアに登録しておく必要があります。
以下の例では、Locationクラスに位置情報を保存しています。
管理画面から位置情報を設定する場合は
geoフィールドは入力形式を緯度経度に変更してください
データストアの値を編集する操作手順は以下の通りです。
- 各レコードの編集するフィールドをダブルクリックすると入力状態になります
- 値を入力したら、エンターキーを押して入力した値を保存します
アプリ側の設定
プッシュ通知内のデータ(ペイロード)を取得するために、
受信処理を行うNCMBGcmListenerServiceを継承したカスタムクラスを作成してください。
AndroidManifestもNCMBGcmListenerServiceの定義をしていた部分に、
カスタムクラスのクラス名を書き換える必要があります。
<service
    android:name="YOUR_PACKAGE_NAME.CustomGcmListenerService"
    android:exported="false">
    <intent-filter>
        <action android:name="com.google.android.c2dm.intent.RECEIVE"/>
    </intent-filter>
</service>
ペイロードからデータを取得するためには、カスタムクラスの
onMessageReceivedメソッドを上書きします。
ペイロードデータ内のlocation_idをもとにデータストアからロケーションを取得します。
以下のメソッドの呼び出しを行っていますが、このあと実装していきます。
- createGeofenceRequest(point):Geofenceの作成
- connectGoogleApiClient():Google API Clientのビルドと接続
@Override
public void onMessageReceived(String from, Bundle data) {
    //ペイロードデータの取得
    if (data.containsKey("com.nifcloud.mbaas.Data")) {
        try {
            JSONObject json = new JSONObject(data.getString("com.nifcloud.mbaas.Data"));

            //ServiceからAPIをリクエストする場合はSDKの再初期化が必要
            NCMB.initialize(
                    this,
                    "YOUR_APP_KEY",
                    "YOUR_CLIENT_KEY"
            );

            //Locationデータの取得
            NCMBObject point = new NCMBObject("Location");
            point.setObjectId(json.getString("location_id"));
            point.fetchObject();

            Log.d(TAG, "location name:" + point.getString("name"));

            //Geofenceの作成
            createGeofenceRequest(point);

            //Google API Clientのビルドと接続
            connectGoogleApiClient();
        } catch (JSONException e) {
            //エラー処理
            Log.e(TAG, "error:" + e.getMessage());
        } catch (NCMBException e) {
            Log.e(TAG, "error:" + e.getMessage());
        }
    }
    //デフォルトの受信処理はコメントアウト
    //super.onMessageReceived(from, data);
}
位置情報を利用するための設定
位置情報を利用する場合は、AndroidManifestでパーミッションを設定する必要があります。
<manifest xmlns:android="http://schemas.android.com/apk/res/android"
    package="biz.rebirthble.geolocationpush" >

    <uses-permission android:name="android.permission.ACCESS_FINE_LOCATION"/>
Android Marshmallow での設定
このサンプルコードで利用しているACCESS_FINE_LOCATIONは、アプリ実行時にパーミッションを利用者に許可してもらう必要があります。
(参考)Requesting Permissions at Run Time
- MainActivityでpermissionの許可画面を表示する
- 以下の処理を、onCreateメソッドの中に実装します。
//permissionの許可をしてもらう
if (ContextCompat.checkSelfPermission(this,
        android.Manifest.permission.ACCESS_FINE_LOCATION)
        != PackageManager.PERMISSION_GRANTED) {

    // Should we show an explanation?
    if (ActivityCompat.shouldShowRequestPermissionRationale(this,
            android.Manifest.permission.ACCESS_FINE_LOCATION)) {
    } else {
        ActivityCompat.requestPermissions(this,
                new String[]{android.Manifest.permission.ACCESS_FINE_LOCATION},
                MY_PERMISSIONS_REQUEST_ACCESS_FINE_LOCATION);
    }
}
- 許可画面を表示したあとのハンドリングを実装
@Override
public void onRequestPermissionsResult(int requestCode, String[] permissions,
        int[] grantResults)
{
    switch (requestCode) {
        case MY_PERMISSIONS_REQUEST_ACCESS_FINE_LOCATION: {
            // If request is cancelled, the result arrays are empty.
            if (grantResults.length > 0
                    && grantResults[0] == PackageManager.PERMISSION_GRANTED) {
                Log.d("MainActivity", "ACCESS_FINE_LOCATION is granted!");

            } else {
                Log.d("MainActivity", "ACCESS_FINE_LOCATION is denied!");
            }
            return;
        }
    }
}
Geofenceを作成
createGeofenceRequestメソッドを実装していきます。
- Geofenceオブジェクトの作成
//Geofenceオブジェクトの作成
Geofence geofence = new Geofence.Builder()
        .setRequestId(point.getString("name"))
        .setCircularRegion(
                point.getGeolocation("geo").getLatitude(),
                point.getGeolocation("geo").getLongitude(),
                GEOFENCE_RADIUS_IN_METERS
        )
        .setExpirationDuration(GEOFENCE_EXPIRATION_IN_MILLISECONDS)
        .setTransitionTypes(Geofence.GEOFENCE_TRANSITION_ENTER |
                Geofence.GEOFENCE_TRANSITION_EXIT)
        .build();
- GeofencingRequestオブジェクトの作成
- すでにGeofence内に端末があった場合も通知させる
GeofencingRequest.Builder builder = new GeofencingRequest.Builder();
builder.setInitialTrigger(GeofencingRequest.INITIAL_TRIGGER_ENTER);
builder.addGeofence(geofence);
mGeofenceRequest = builder.build();
Google API Clientの設定
connectGoogleApiClientメソッドを実装します
- Google API Clientの作成と接続を行う
protected synchronized void connectGoogleApiClient() {
    mGoogleApiClient = new GoogleApiClient.Builder(this)
            .addConnectionCallbacks(this)
            .addOnConnectionFailedListener(this)
            .addApi(LocationServices.API)
            .build();

    mGoogleApiClient.connect();
}
PendingIntentの作成
Geofenceを追加するときにPendingIntentが必要になるので、
getGeofencePendingIntentメソッドでPendingIntentを返すようにします。
private PendingIntent getGeofencePendingIntent() {

    Intent intent = new Intent(this, GeofenceTransitionsIntentService.class);
    // We use FLAG_UPDATE_CURRENT so that we get the same pending intent back when
    // calling addGeofences() and removeGeofences().
    return PendingIntent.getService(this, 0, intent, PendingIntent.
            FLAG_UPDATE_CURRENT);
}
Geofenceの追加
Google API Clientの接続後に実行されるコールバック(onConnectedメソッド)で
以前に設定したGeofenceの削除と、新規Geofenceの追加を行います。
@Override
public void onConnected(Bundle bundle) {
    //古いGeofenceの削除
    SharedPreferences preferences = getSharedPreferences(PREFS_NAME, MODE_PRIVATE);
    String geofenceName = preferences.getString(GEOFENCE_NAME, "");

    if (!geofenceName.equals("")) {
        //Geofenceの削除
        LocationServices.GeofencingApi.removeGeofences(
                mGoogleApiClient,
                Arrays.asList(geofenceName)
        );
    }

    //新規Geofenceの作成
    SharedPreferences.Editor editor = preferences.edit();
    editor.putString(
            GEOFENCE_NAME,
            mGeofenceRequest.getGeofences().get(0).getRequestId()
    );

    LocationServices.GeofencingApi.addGeofences(
            mGoogleApiClient,
            mGeofenceRequest,
            getGeofencePendingIntent()
    ).setResultCallback(this);
}
Geofenceに入った場合のハンドリング
GeofenceTransitionsIntentServiceの作成
IntentServiceを拡張したGeofenceTransitionsIntentServiceクラスを作成し、
AndroidManifestでの登録を行います。
<service android:name=".GeofenceTransitionsIntentService"/>
onHandleIntentメソッドの実装
Geofenceのモニタリング中にイベントが発生した場合、onHandleIntentメソッドが実行されますので、イベントの中身を確認して通知を表示する処理を実装します。
@Override
protected void onHandleIntent(Intent intent) {
    //エラー処理
    GeofencingEvent geofencingEvent = GeofencingEvent.fromIntent(intent);
    if (geofencingEvent.hasError()) {
        Log.e(TAG, "error :" + String.valueOf(geofencingEvent.getErrorCode()));
        return;
    }

    //Geofence内での動きを取得
    int geofenceTransition = geofencingEvent.getGeofenceTransition();

    // Geofence内に入ってきたかを判別する
    if (geofenceTransition == Geofence.GEOFENCE_TRANSITION_ENTER) {
        //このあとここに処理を実装します
    }

    //Geofenceの名前を取得
    List<Geofence> triggeringGeofences = geofencingEvent.getTriggeringGeofences();
    String geofenceName = triggeringGeofences.get(0).getRequestId();

    //通知を表示させる
    sendNotification(geofenceName);
}
- sendNotificationメソッドを実装する
private void sendNotification(String geofenceName) {
    Log.i(TAG,"onSendNotification");

    android.support.v4.app.NotificationCompat.Builder mBuilder =
            new NotificationCompat.Builder(this)
                    .setSmallIcon(getApplicationInfo().icon)
                    .setContentTitle("Geolocation Push")
                    .setContentText("Enter to:" + geofenceName);

    Intent resultIntent = new Intent(this, MainActivity.class);

    TaskStackBuilder stackBuilder = TaskStackBuilder.create(this);
    stackBuilder.addParentStack(MainActivity.class);
    stackBuilder.addNextIntent(resultIntent);
    PendingIntent resultPendingIntent =
            stackBuilder.getPendingIntent(
                    0,
                    PendingIntent.FLAG_UPDATE_CURRENT
            );
    mBuilder.setContentIntent(resultPendingIntent);

    NotificationManager mNotificationManager =
            (NotificationManager) getSystemService(Context.NOTIFICATION_SERVICE);
    mNotificationManager.notify(0, mBuilder.build());
}
管理画面からSilent Push通知を配信する
管理画面からSilent Push通知を配信する場合は、
以下のような設定で配信を行ってください。
- JSONの欄に、データストアに登録した位置情報データのobjectIdを指定する
{"locationId":"LOCATION_ID"}
- タイトル、メッセージは空白
お探しの内容が見つからなかった場合はユーザーコミュニティ
もご活用ください。(回答保証はいたしかねます)
なお、 Expertプラン以上のお客様はテクニカルサポートにてご質問を承らせて頂きます。
推奨画面サイズ1024×768px以上