プッシュ通知(Obj-C)
 プッシュ通知
 会員管理・認証
 SNS連携
SNS連携 データストア
 位置情報検索
 ファイルストア
 スクリプト
スクリプト位置情報連動配信
Contents |
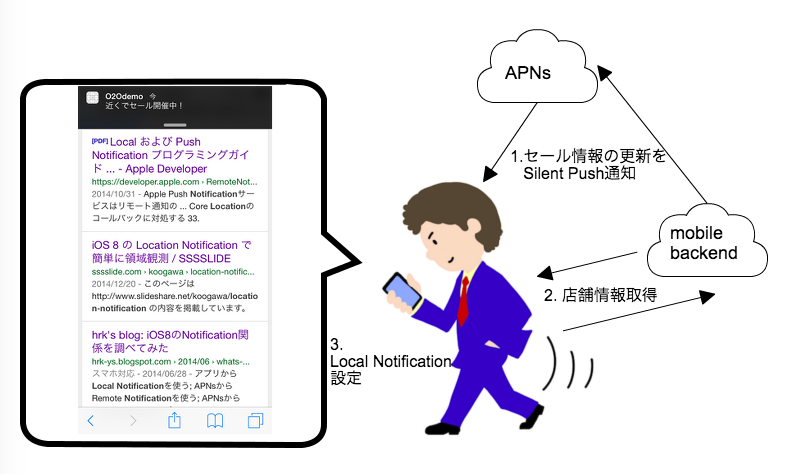
位置情報連動配信の概要
位置情報のデータ保存とサーバーからのプッシュ通知配信に
ニフクラ mobile backendを利用します。
iOS8から追加されたLocation Notificationと組み合わせることで、
通知を行う位置を動的に更新できる仕組みを作ります。
(アプリの主な動作フロー)
- Silent Push通知を配信
- Silent Push通知の内容から通知を行う位置を取得
- Location Notificationを設定
このページでは、以下の設定が済んでいるものとして説明していきます。
- iOS SDKのインストールと初期化
- 通常のプッシュ通知設定
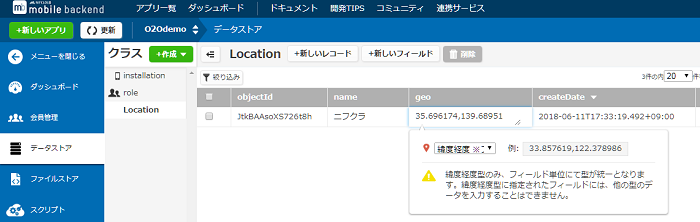
位置情報データの登録
位置情報をあらかじめデータストアに登録しておく必要があります。
以下の例では、Locationクラスに位置情報を保存しています。
管理画面から位置情報を設定する場合は
geoフィールドは入力形式を緯度経度に変更してください
データストアの値を編集する操作手順は以下の通りです。
- 各レコードの編集するフィールドをダブルクリックすると入力状態になります
- 値を入力したら、エンターキーを押して入力した値を保存します
アプリ側の設定
content-availableが指定されてプッシュ通知が行われた場合、AppDelegateクラスの
application:didReceiveRemoteNotification:fetchCompletionHandler:メソッドが呼びだされます。
- (void)application:(UIApplication *)application
    didReceiveRemoteNotification:(NSDictionary *)userInfo
    fetchCompletionHandler:(void (^)(UIBackgroundFetchResult))completionHandler
{
    //ペイロードから位置情報を保持しているデータのobjectIdを取得
    NSString *locationId = nil;
    locationId = [userInfo objectForKey:@"locationId"];

    if (locationId){
        //このあとここに処理を書いていきます
    }
}
Silent Push通知の内容から通知を行う位置を取得
取得したobjectIdをNCMBObjectのインスタンスにセットして
fetchInBackgroundWithBlockメソッドを呼び出すと、
データストアからobjectIdを基にデータが取得されます。
//LocationクラスのNCMBObjectを作成
NCMBObject *location = [NCMBObject objectWithClassName:@"Location"];

//店舗情報のIDを設定
location.objectId = locationId;

//設定されたIDをもとにクラウドからデータを取得
[location fetchInBackgroundWithBlock:^(NSError *localError) {
    if (localError){
        blk(localError);
    } else {

        //このあとここに処理を書いていきます
    }
}];
Location Notificationを設定
Location Notification設定方法はiOS 10未満とiOS 10以上の場合で異なりますが、両場合を考慮した実装方法を説明していきます。
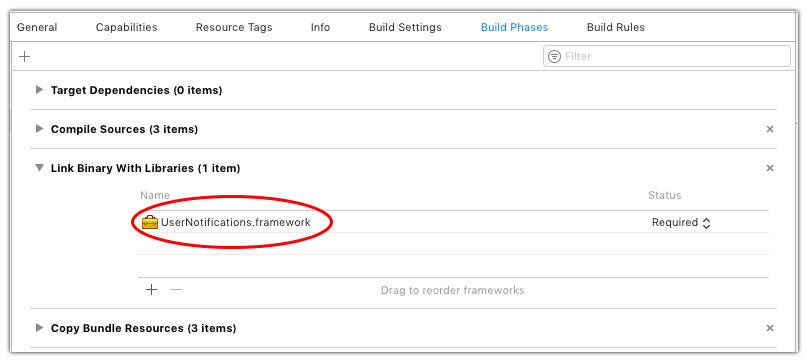
以下のようにUserNotificationsを利用できるように準備します。
- Xcode上でプロジェクト設定画面を開き、Build Phasesを選択し、Link Binary With LibrariesにUserNotifications.frameworkを追加します。
- Location Notificationを設定したいファイルに以下のコードを追加します。
#import <UserNotifications/UserNotifications.h>

//iOS 10以上フラグ
#define OS_10_0_0_OR_NEWER [[NSProcessInfo processInfo] isOperatingSystemAtLeastVersion:(NSOperatingSystemVersion){10, 0, 0}]
Location Notification用のNotificationオブジェクトを作成します
//再設定用のNotificationを作成
if (OS_10_0_0_OR_NEWER){
    UNMutableNotificationContent *content = [UNMutableNotificationContent new];
    content.body = [NSString stringWithFormat:@"近くでセール開催中!"];
    content.sound = [UNNotificationSound defaultSound];
    content.badge = [NSNumber numberWithInteger:1];
} else {
    UILocalNotification *localNotif = [[UILocalNotification alloc] init];
    if (localNotif == nil)
        return;
    localNotif.alertBody = [NSString stringWithFormat:@"近くでセール開催中!"];
    localNotif.soundName = UILocalNotificationDefaultSoundName;
    localNotif.applicationIconBadgeNumber = 1;
}
CLCircularRegionの変数を用意し、
取得したデータの位置情報からCLLocationCoordinate2Dを作成します。
このCLLocationCoordinate2Dをregionに設定し、
そのregionをNotificationに設定するとLocation Notificationが行われます。
//CLCircularRegionの変数を用意
CLCircularRegion *region = nil;

//regionに設定するCLLocationCoordinate2Dを作成
CLLocationCoordinate2D location = CLLocationCoordinate2DMake(geoPoint.latitude,
                                                             geoPoint.longitude);
リージョンを作成して、リージョンから外に出た場合の通知をOFFにします。
//リージョン作成(中心点、そこからの半径、regionの識別子を設定)
region = [[CLCircularRegion alloc] initWithCenter:location
                                           radius:50.0
                                       identifier:@"salePoint"];

//リージョンから外に出た場合には通知が行われないようにNOを設定
region.notifyOnExit = NO;
リージョンを設定してLocation Notificationを登録します。
//リージョンを設定してLocation Notificationを登録
if (OS_10_0_0_OR_NEWER){
    UNLocationNotificationTrigger *trigger = [UNLocationNotificationTrigger triggerWithRegion:region repeats:NO];
    UNNotificationRequest *request = [UNNotificationRequest requestWithIdentifier:@"NotificationIdentifier" content:content trigger:trigger];

    UNUserNotificationCenter *center = [UNUserNotificationCenter currentNotificationCenter];
    [center requestAuthorizationWithOptions:(UNAuthorizationOptionBadge | UNAuthorizationOptionSound | UNAuthorizationOptionAlert)
        completionHandler:^(BOOL granted, NSError * _Nullable error) {
            if (!error) {
                NSLog(@"request authorization succeeded!");
            } else {
                NSLog(@"request authorization fail!");
            }
        }];
    [center addNotificationRequest:request withCompletionHandler:^(NSError * _Nullable error) {
        if (!error) {
            NSLog(@"Local Notification succeeded");
        }
        else {
            NSLog(@"Local Notification failed");
        }
    }];
} else {
    localNotif.region = region;
    localNotif.regionTriggersOnce = YES;
    [[UIApplication sharedApplication] scheduleLocalNotification:localNotif];
}
管理画面からSilent Push通知を配信する
管理画面からSilent Push通知を配信する場合は、
以下のような設定で配信を行ってください。
- JSONの欄に、データストアに登録した位置情報データのobjectIdを指定する
{"locationId":"LOCATION_ID"}
- タイトル、メッセージは空白
- iOS向けに配信
- 音声ファイル名のdefaultは削除
- content-availableを有効にする
参考資料
位置情報連動プッシュ通知を利用してO2Oアプリを作成するチュートリアルを公開しています。
チュートリアルではより詳細な手順を説明しています。
お探しの内容が見つからなかった場合はユーザーコミュニティ
もご活用ください。(回答保証はいたしかねます)
なお、 Expertプラン以上のお客様はテクニカルサポートにてご質問を承らせて頂きます。
推奨画面サイズ1024×768px以上